Bad Pool Header Windows 10 Error – How to Fix Bad Pool Header
Bad Pool Header Windows 10 is a common problem and usually refer to the error “0x00000019″. Also, this error is also known as Blue Screen of Death. Blue Screen of Death errors in Windows 10 are usually due to the memory allocation problem, maybe your RAM is not properly cleaned or fixed. In this article, we are going to help you about How to Fix Bad Pool Header.
Bad Pool Header Windows 10 Won’t Boot
This is a common problem that your Windows 10 won’t boot and you are facing the error of bad pool header windows 10. Here are the common reasons:
- Drivers are not properly installed in your Windows 10.
- Your antivirus Software is causing a problem in your system.
- Also, your hard drive has bad sectors.
- New Hardware is not compatible with your System requirements.
Bad pool header windows 10 reddit means it more discussed on different platforms include social media forums of Windows. For example, reddit.
How to Fix Bad Pool Header Windows 10 Crash
There are many ways to fix the hp bad pool header, Bad Pool Header Windows 10. Few of them are below. Moreover, we recommend to try these methods one by one:
1# Uninstall or Remove Recently Installed Software or Hardware
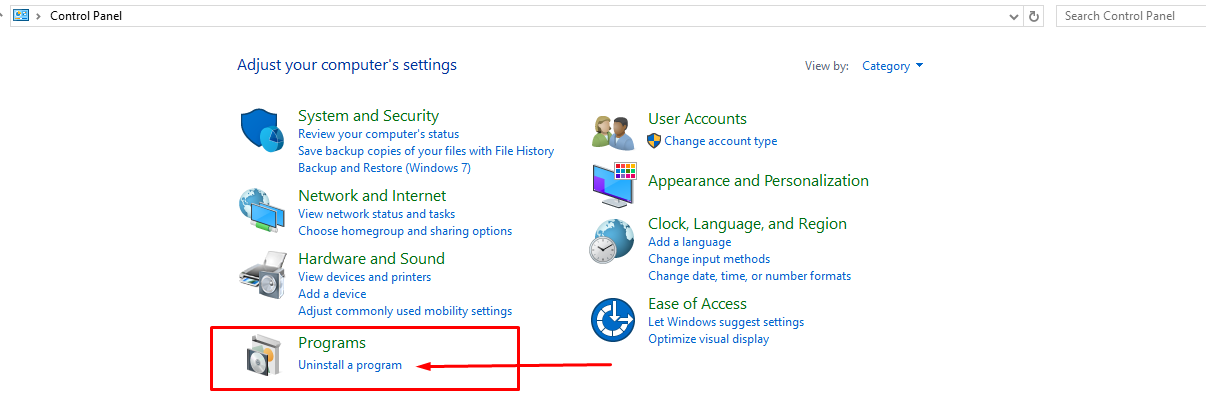
If you think you are facing this error because of recently installed software or hardware. We recommend to remove or completely uninstall the software or remove the hardware. To uninstall any software follow the below steps:
- Go to Start Menu.
- Open Control Panel.
- Click on Uninstall a Program.
- Now Select the recently installed program.
- Right-click on each program and uninstall.
- Restart Your Windows 10 now.

2# Restore Your Windows 10
Note: If you want to restore Windows 7 and restore Windows 10. Both are different, to restore Windows 7 go check here: How to Restore Windows 7. The method to restore Windows 10 are given below:
Below are the few points to restore Windows 10 for bad pool header error.
- In the Start Menu, Search for System Restore.
- Open “Create a System Restore”.
- Click on the System Protection Tab
- Click on Configure.
Enable System Restore Windows 10?
After click on “Configure”. In the new Window,
- Click on “Turn On System Protection”.
- Choose Max Usage up to 5%.
- Click OK to save changes.
Note: To disable System Restore, just follow the same steps and Click on “Turn Off System Protection”.
Finally, Create System Restore or Repair Windows 10?
Once the System Protection is On, also the System Restore in Windows 10 enables. In addition, you have to create a System Restore Windows 10.
- In System Properties > Choose System Protection.
- Click on ‘Create‘ > In the new Window, Type “Create System Restore“
- Submit Ok to save changes.

Create System Restore will take a few seconds.
- In System Properties > Choose System Protection.
- Click on “Restore”
- Choose the Restore Windows 10 point.
- Click Next to Continue.
- Select Finish to start.
If you feel any confusion in this whole process, go to step by step with pictures in this content: How to System Restore in Windows 10.
3# Try to Disable Fast Startup feature If bad pool header windows 10 won’t boot
Disable the fast startup in Windows 10. To do this:
- Go to the Control Panel.
- Search for Power Options.
- On the left side, Click on Choose what the power buttons do.
- Now Click on “Change settings that are currently unavailable“.
- Click on Turn On Fast Startup.
- Check Mark should disappear.
Final Conclusion For Bad Pool Header Windows
In the end, we have concluded that a Bad Pool Header error is a common problem and is also known as blue screen of death. On the other hand, if you don’t want to apply above these methods then you have to Disconnect external devices. Because it is possible that it may interfere the Windows 10. On the other hand, if you are connected to Internet, you may need to update the Windows 10 drivers using device manager.
Let us know in the Comment if you face any problem.
Bad Pool Header Windows 10 Error – How to Fix Bad Pool Header
![Bad Pool Header Windows 10 Error – How to Fix Bad Pool Header]() Reviewed by kashif javed
on
July 21, 2019
Rating:
Reviewed by kashif javed
on
July 21, 2019
Rating:


No comments: